

The table I used for the last two years was an office table from Mike's parents' attic, but it was made of cheap, peeling laminate that didn't photograph well, with lots of chunks of paint, glue and paper stuck to it from my various projects. Sometimes a well-worn painting desk can look really cool... this one didn't. I know looks are less important than utility, but I needed to have a surface that was neutral and not distracting when taking professional-looking photos of my work. (Not having jagged chunks of dried glue cutting into my forearms when I worked would be a plus, too.) I've always liked the look of sawhorse tables, and that style fit the semi-industrial look of my studio. And it was so easy to make!
Home Depot haul: two Fulton metal sawhorse legs ($16 each), three 6'x10"x1" soft pine boards ($9 each), a can of some Miniwax wood stain ($10), a 1" x 2" wood plank ($2) and 1" nails. IKEA sells prettier wood sawhorse trestle legs, but since my studio is entirely brick with a ton of random black pipes all over, metal was fine. And it meant I only had to brave a 1-story Home Depot instead of a 4-story IKEA.
Here are the boards laid out on my old table:

To give the table a rougher, more rustic look I used Young House Love's tips for making new wood look old. I whacked the boards with both ends of my hammer. I made random nail holes throughout and even nailed a couple nails sideways. Hammered the handle of a paint roller into the boards to make some cool lines.
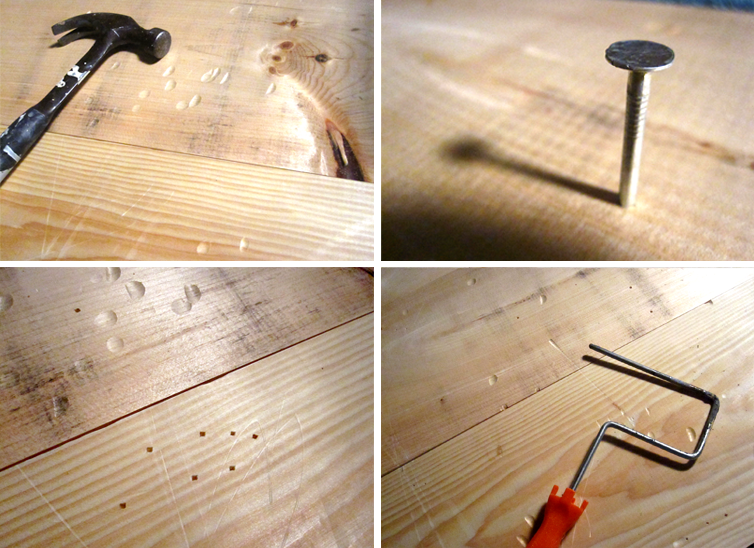
The YHL blog advised dragging screws across the boards and luckily there are like two million random screws and nails sticking out of the bricks all over our apartment (not quite as dangerous at it sounds but definitely not child-safe) so I pulled one from the wall and scratched around with it.
 |
| Random screws and a sharp metal bracket sticking out of our wall. Safety first. |
I got a little overzealous and looked around for other objects that could be hammered into the wood to make cool patterns and dents. Metal paint stirrer? Old paint can? A horseshoe? Why not.

As you can see the wood is all kinds of messed up now and almost looks like it actually had some kind of life outside of an urban Home Depot. I should mention that all of this is REALLY LOUD. As I type this, our upstairs neighbors are breaking the cardinal rule of city apartment-dwelling and letting their kid stomp on their hardwood floors and throw tantrums just like he does for about two hours every night, so I'm beyond caring about them, but if you actually like your neighbors I'd recommend putting a few towels underneath the boards to muffle the noise while you hammer.

Next, I sanded the wood, wiped the dust, then stained it with two very thin coats of Miniwax Whitewash. It lightens the wood, which is good, but I was disappointed that it didn't bring out the grain and dings as much as a darker stain would have. Here's a closeup of the stained vs. unstained wood and some of the dings:

Our friend Brendan brought us a handsaw and with the boards propped up to dry in front of a fan, Mike cut the 1" x 2" planks down to size, about six inches shorter than the width of the boards combined. I could have done it myself but... I just didn't want to. And what's the point of keeping a boyfriend around if you can't ask them to do stuff you're too lazy to do?*

*TOTALLY JUST KIDDING. Thanks Mike!

The planks were nailed to the underside of the boards to attach them, using 1.25" nails. I'm pretty sure the hardwood flooring in our apartment is worth more than my life so I always have a drop cloth in my studio covering it. You could use towels or newspaper to ensure no rogue wood chips or wet stain ruin your floor.

Here is where the project went mildly awry, because I mistakenly believed that by buying wood marked as 10" wide, I'd actually be getting wood 10" wide. However, in Dorchester Home Depot Land, 10" wood is actually only 8.5" wide, so my 30" tabletop became a 25.5" tabletop. The sawhorses were 30" wide and stuck out, so I had to get another board in the morning, repeat the process and attach it to the other three.

Lastly, I used three coats of Miniwax fast-drying oil-based semigloss varnish to seal it. This is the same stuff I used on our barn door coffee table because of how easy it is to wipe off stains and spills off a slick surface. It's important to do this in a room with good ventilation or outside because most chemical varnishes have a hunger for brain cells.
Anyway the final product was a gorgeous, rustic yet minimalist table that I am in love with and really enjoy sitting at to work. It's about a foot longer and an inch lower but with more leg clearance than my old table, so my flat file drawer rolls right underneath when I'm not using it. There's room for a plant, art supplies and even extra large canvases:

After setting up the table and giving the room a good organizing, it feels like my studio is finally the perfect little nest to seclude myself in and just paint away.

Even Gracie has a spot.
looks like a lovely place to work from, how wonderful, thanks for sharing your table making tips.....may have to show this to my son....see if he could make one for me!
ReplyDelete" most chemical varnishes have a hunger for brain cells."
ReplyDeleteHehe. Made me laugh out loud. xo